Jul 02, 2024
Version 2
Device Fabrication Using Soft Lithography Technique V2 V.2
- Jann Gamboa1,
- Freeman Lan1
- 1Institute of Biomedical Engineering, University of Toronto


Protocol Citation: Jann Gamboa, Freeman Lan 2024. Device Fabrication Using Soft Lithography Technique V2. protocols.io https://dx.doi.org/10.17504/protocols.io.5qpvokpydl4o/v2Version created by Jann Gamboa
License: This is an open access protocol distributed under the terms of the Creative Commons Attribution License, which permits unrestricted use, distribution, and reproduction in any medium, provided the original author and source are credited
Protocol status: Working
We use this protocol and it's working
Created: June 30, 2024
Last Modified: July 02, 2024
Protocol Integer ID: 102705
Keywords: Microfluidics, Droplet microfluidics
Disclaimer
DISCLAIMER – FOR INFORMATIONAL PURPOSES ONLY; USE AT YOUR OWN RISK
The protocol content here is for informational purposes only and does not constitute legal, medical, clinical, or safety advice, or otherwise; content added to protocols.io is not peer reviewed and may not have undergone a formal approval of any kind. Information presented in this protocol should not substitute for independent professional judgment, advice, diagnosis, or treatment. Any action you take or refrain from taking using or relying upon the information presented here is strictly at your own risk. You agree that neither the Company nor any of the authors, contributors, administrators, or anyone else associated with protocols.io, can be held responsible for your use of the information contained in or linked to this protocol or any of our Sites/Apps and Services.
Abstract
Standard Operating Procedure
Institute of Biomedical Engineering
University of Toronto
Name of the procedures: Device Fabrication using Soft Lithography Technique
Location: MB308A
PI: Dr. Freeman Lan
Instructor: Jann Gamboa
Protocol materials
PGMEAMerck MilliporeSigma (Sigma-Aldrich)Catalog #484431-4L
In 21 steps
SU-8 3025Kayaku Advanced MaterialsCatalog #SU-8 3025
In 4 steps
Potential Hazards
Potential Hazards
- PGMEAMerck MilliporeSigma (Sigma-Aldrich)Catalog #484431-4L is a reproductive toxin and goes through gloves!
2. Wear cut resistant gloves when using the razor!
3. Always put the lid on when using the
Equipment
SCK-300 | SCK-300P Spin Coater Kit
NAME
Spin Coater
TYPE
Intras Scientific
BRAND
SCK-300 | SCK-300P Spin Coater Kit
SKU
LINK


Note: The wafer could come off and cut you, or SU-8 3025Kayaku Advanced MaterialsCatalog #SU-8 3025 could spray everywhere.
4. AquapelAmazonCatalog #B084R7LXY5 burns the eyes! Put on safety goggles when using
Equipment Preparation
Equipment Preparation
Hot Plates and Oven
The first step consists of turning one hot plate to 95 °C and another hot plate to ~200 °C
Turn on the
Equipment
BLACK+DECKER 4-Slice Convection Oven, Stainless Steel, TO1313SBD
NAME
Oven
TYPE
BLACK + DECKER HOME
BRAND
B00GGFHH4U
SKU
LINK

by turning the timer to "stay on" and the temperature to 60 °C .
Equipment Checklist:
1. Tweezers (2)
2. Pyrex dish for the PGMEAMerck MilliporeSigma (Sigma-Aldrich)Catalog #484431-4L
3. Isopropyl AlcoholUofT MedStoreCatalog #934-504-SCA599 waste beaker
4. PGMEAMerck MilliporeSigma (Sigma-Aldrich)Catalog #484431-4L waste beaker
5. SU-8 3025Kayaku Advanced MaterialsCatalog #SU-8 3025 solid Waste Container
6. Aluminum foil
7. Double sided tape
8. Glass Slabs (for exposure)
9. Timers
Equipment
SCK-300 | SCK-300P Spin Coater Kit
NAME
Spin Coater
TYPE
Intras Scientific
BRAND
SCK-300 | SCK-300P Spin Coater Kit
SKU
LINK
Ensure that the spin coater cover and base are covered with aluminum foil.
Ensure that the spin coater is programmed to the desired 2-step rpm (1000 rpm for 00:00:10 and the appropriate rpm for 00:00:30 ; refer to Figure 1)

Figure 1 is from Kayaku Advanced Materials' SU-8 3000 Permanent Negative Epoxy Photoresist Technical Data Sheet
40s
Place a piece of double sided tape on the spin coater.
The tape should cover the diameter of the spin coater stage and be centered.
Note: There may be times when the tape is not sticking to the spin coater stage. To mitigate this issue, clean the stage with PGMEAMerck MilliporeSigma (Sigma-Aldrich)Catalog #484431-4L to wash off chemicals that are preventing it from sticking:
- Unscrew the stage portion of the spin coater
- Place it on a separate clean beaker.
- Pour PGMEAMerck MilliporeSigma (Sigma-Aldrich)Catalog #484431-4L onto it, just enough to submerge the surface of the stage. You can obtain the PGMEAMerck MilliporeSigma (Sigma-Aldrich)Catalog #484431-4L either from the "Used PGMEA bottle" so long as the number of times that it has been recycled is <10. Otherwise, obtain it from the fresh PGMEA squeeze bottle.
- Agitate the beaker gently for 00:05:00
- After 00:05:00 , pick up the stage using tweezers and wash it off for the last time with fresh PGMEAMerck MilliporeSigma (Sigma-Aldrich)Catalog #484431-4L over the same beaker.
- Wash the stage with Isopropyl AlcoholUofT MedStoreCatalog #934-504-SCA599 over the Isopropyl AlcoholUofT MedStoreCatalog #934-504-SCA599 waste beaker.
- Blow dry the spin coater stage using the Dyson technique.
- Proceed to place the double sided tape on the spin coater.
- Discard the PGMEAMerck MilliporeSigma (Sigma-Aldrich)Catalog #484431-4L to the "Fully depleted PGMEA waste bottle".
10m
Equipment
Silicon Wafer
NAME
SU-8 Substrate
TYPE
University Wafer
BRAND
ID-452
SKU
LINK
Locate or prepare a beaker for the waste Isopropyl AlcoholUofT MedStoreCatalog #934-504-SCA599 .
Pick up the silicon wafer using the tweezer located in the fume hood.
Rinse the wafer with Isopropyl AlcoholUofT MedStoreCatalog #934-504-SCA599 .
Make sure that the Isopropyl AlcoholUofT MedStoreCatalog #934-504-SCA599 is ending up in the waste beaker for alcohol.
Subsequently, use compressed air to blow the alcohol off of the wafer (using the Dyson technique; ask Jann or Freeman if you are unsure)
Spin-coating and Soft Baking
Spin-coating and Soft Baking
Centre the silicon wafer on the spin-coater stage.
Note: It is imperative to centre the silicon wafer onto the spin coater stage as it can lead to uneven coating. If this occurs, proceed to wash off the SU-8 3025Kayaku Advanced MaterialsCatalog #SU-8 3025 on the wafer with PGMEAMerck MilliporeSigma (Sigma-Aldrich)Catalog #484431-4L for 00:05:00 using the instructions above over a Pyrex dish, not the beaker.
5m
Obtain the SU-8 3025Kayaku Advanced MaterialsCatalog #SU-8 3025 NOT from the main SU-8 bottle but from the pre-made aliquots.
Place about 1 mL to 2 mL (the size of a quarter coin) of the SU-8 3025Kayaku Advanced MaterialsCatalog #SU-8 3025 on the centre of the wafer, taking care not to create air bubbles. Make sure also that you do not get any SU-8 3025Kayaku Advanced MaterialsCatalog #SU-8 3025 on the neck of the bottle because it would then be hard to close the bottle.
Note 1: DO NOT let the SU-8 3025Kayaku Advanced MaterialsCatalog #SU-8 3025 bottle be open for a longer period of time because the compound quickly evaporates and changes the compound in the bottle.
Note 2: Note that SU-8 3025Kayaku Advanced MaterialsCatalog #SU-8 3025 solid wastes should only be placed in the yellow container that is marked "SU-8 Solid Waste"
Spin the wafer according to the appropriate rpm (1000 for 00:00:10 and refer to Figure 1 for the appropriate rpm for 00:00:30 )
40s
After spinning, pick up the wafer on its edge and place it on the 95 °C hot plate for 00:10:00
10m
Note 1: Make sure that the double sided tape from the spin coater is not stuck on the bottom of the wafer before placing it on the hot plate.
Note 2: Adjust the soft bake times according to the thickness of the channel
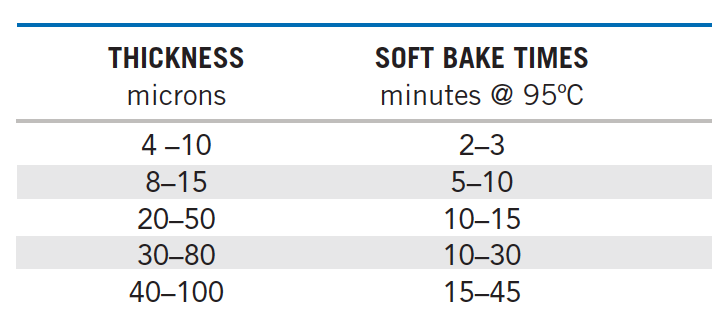
The table is from Kayaku Advanced Materials' SU-8 3000 Permanent Negative Epoxy Photoresist Technical Data Sheet
Photolithographic Exposure
Photolithographic Exposure
30s
Place the wafer and the print out of the mask in between two pieces of glass such that the order is:
Glass | wafer | mask | Glass <––– UV Light
Note 1: Make sure that the mask is facing up – that is, the description (writings) on the mask is facing up. You can tell that the mask is facing up if you can read the description.
Important: Wear the UV glasses.
Ensure that the
Equipment
UV Flashlight
NAME
UV Flashlight
TYPE
Alonefire
BRAND
B09J885Q6N
SKU
LINK
is on full battery, that is, 4/4 bars.
Place the UV light apparatus over on top of the glasses. Make sure that the box is covering the entirety of the glasses. Make sure that you line up the UV light on the centre of the wafer and the mask.
Inform everyone in the lab before turning on
Expose for 00:00:30
30s
Post-Exposure Baking (PEB)
Post-Exposure Baking (PEB)
8m
Heat the wafer again by placing it on the 95 °C hot plate for 00:03:00 to 00:05:00
8m
Note 1: At this point you should be able to see the outlines of the channel on the wafer. No visible latent image during or after PEB means that there was insufficient exposure, temperature or both.
Channel Development
Channel Development
For this step, you would need a compound called PGMEAMerck MilliporeSigma (Sigma-Aldrich)Catalog #484431-4L . Locate first the bottle that says "Used PGMEA". If the number of times that the product has been reused is less than 10, proceed to use the "Used PGMEA". Otherwise, use fresh PGMEAMerck MilliporeSigma (Sigma-Aldrich)Catalog #484431-4L from the squeeze bottle or the actual bottle.
WARNING 1: PGMEAMerck MilliporeSigma (Sigma-Aldrich)Catalog #484431-4L goes through gloves – make sure that you double glove and/or change your gloves if you feel it necessary
WARNING 2: PGMEAMerck MilliporeSigma (Sigma-Aldrich)Catalog #484431-4L is a reproductive toxin – it is not good for pregnant women
Pour PGMEAMerck MilliporeSigma (Sigma-Aldrich)Catalog #484431-4L onto the Pyrex dish, just enough to submerge the wafer, thereby developing it.
If the PGMEAMerck MilliporeSigma (Sigma-Aldrich)Catalog #484431-4L has been used more than 10 times, dispose of it in the PGMEA waste container and obtain it from the original bottle.
Cover the Pyrex dish using aluminum foil.
Manually agitate (gentle) the Pyrex dish every once in a while.
The development time depends on the thickness (height) of the channels. See the table below for guidance.
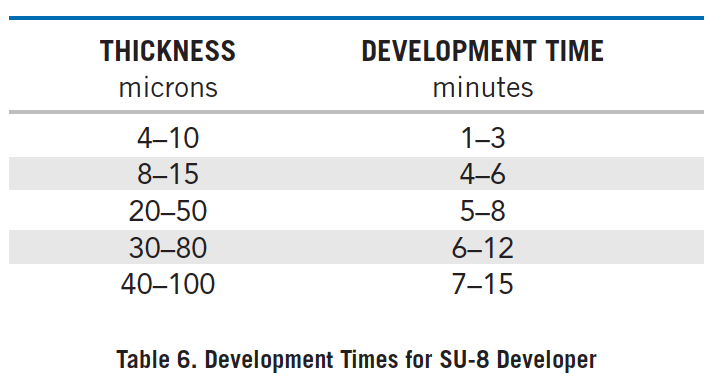
Table 6 is from Kayaku Advanced Materials' SU-8 3000 Permanent Negative Epoxy Photoresist Technical Data Sheet
After the appropriate development time has passed, take out the wafer using tweezers.
Rinse the wafer with fresh PGMEAMerck MilliporeSigma (Sigma-Aldrich)Catalog #484431-4L (over the Pyrex dish)
Rinse the wafer with Isopropyl AlcoholUofT MedStoreCatalog #934-504-SCA599 over the IPA waste beaker
If white precipitates arise, wash with fresh PGMEAMerck MilliporeSigma (Sigma-Aldrich)Catalog #484431-4L over the PGMEA waster beaker to wash off Isopropyl AlcoholUofT MedStoreCatalog #934-504-SCA599 – NOT over to the Pyrex dish containing PGMEAMerck MilliporeSigma (Sigma-Aldrich)Catalog #484431-4L , then back into Pyrex dish to develop longer.
Repeat steps 24-25
If Isopropyl AlcoholUofT MedStoreCatalog #934-504-SCA599 doesn't generate white precipitates, then blow dry off using the Dyson technique
Recycle the PGMEAMerck MilliporeSigma (Sigma-Aldrich)Catalog #484431-4L by pouring it back to the used PGMEA bottle (use the PGMEA funnel). Indicate that the PGMEAMerck MilliporeSigma (Sigma-Aldrich)Catalog #484431-4L has been used once more by writing a line on the bottle.
Note: If the number of lines has reached 10, discard the PGMEAMerck MilliporeSigma (Sigma-Aldrich)Catalog #484431-4L in the PGMEA waste container.
Hard Baking
Hard Baking
2m
Place the wafer on the 200 °C hot plate for 00:02:00
2m
At this point you should be able to view the channels on the device under the microscope. Place the device on a clean petri dish after baking and view the channel from there using the microscopes.
Label the petri dish with the dimensions of the channels, ID of the device, the date, your initials.
Molding a Device
Molding a Device
2m
Prepare the PDMSEllesworth AdhesivesCatalog #2099551 by mixing the Sylgard-186 Curing AgentEllesworth AdhesivesCatalog #2099551 and PDMS BaseEllesworth AdhesivesCatalog #2099551 in 1:11 ratio
For 30 g , you would need 2.5 g of the Sylgard-186 Curing AgentEllesworth AdhesivesCatalog #2099551 and fill the rest with the PDMS BaseEllesworth AdhesivesCatalog #2099551 (desired final amount x 1/12 = amount of elastomer needed)
Mix vigorously using the Dremel tool or manually using the mixing sticks until you get an opaque colour and a lot of bubbles.
Degas or desiccate until the PDMSEllesworth AdhesivesCatalog #2099551 is clear is free from air bubbles using the
Equipment
Vacuum Desiccator
NAME
Ted Pella
BRAND
2246
SKU
LINK
Any vacuum desiccator that will fit your samples will work
SPECIFICATIONS

While waiting, place the wafer on a petri dish. Cover it so that it is free from dust.
Once the de-gassing is done, pour the PDMSEllesworth AdhesivesCatalog #2099551 on top of the wafer.
Make sure that the temperature of the oven is around 60 °C . Place it in the oven for several hours or even Overnight
Important: since the temperature of the oven fluctuates drastically, place the cover of the petri dish at the bottom by placing the device on top of it so that it does not melt.
Harvesting the Device
Harvesting the Device
After several hours, take the device out of the oven.
IMPORTANT: Wear the cut resistant gloves.
Cut the device mold using a scalpel. Make sure that you are not cutting into the channels and don't push too hard on the wafer or it will splinter
Peel the device mold using tweezers or your hands
Note 1: It is very easy to break the silicon wafer so when you are cutting or peeling off the device, be very careful not to break the wafer.
Punch the inlet and outlets of the device using the manual puncher.
Tape the device so that it would be free from dust.
Plasma Bonding the Device
Plasma Bonding the Device
Speak to Jann or Freeman about this or refer to the SOP for the Harrick Plasma Cleaner PDG-32G from the Matsuura Lab
Aquapel Treatment
Aquapel Treatment
5m
IMPORTANT: Wear safety glasses!
To make the device mold hydrophobic – cut a piece off of the aquapel syringe tubing.
Stick the tubing into the channel, push just enough to get the liquid into the droplet making a nozzle.
Push air through the channel to clear it out.
Put in the oven for 00:05:00 to dry.
5m
Seal the aquapel syringe tubing by melting the tubing end for a FEW seconds on the hot plate or lamp and sealing it with your gloved fingers.