May 09, 2019
Version 3
CUT&RUN: Targeted in situ genome-wide profiling with high efficiency for low cell numbers V.3
- Derek Janssens1,
- Steven Henikoff2
- 1Basic Sciences Division, Fred Hutchinson Cancer Research Center, 1100 Fairview Ave N, Seattle, Washington, USA 98109;
- 2Howard Hughes Medical Institute, Basic Sciences Division, Fred Hutchinson Cancer Research Center, 1100 Fairview Ave N, Seattle, Washington, USA 98109.
- Human Cell Atlas Method Development Community
- Low-cost, high-quality ...


External link: https://www.biorxiv.org/content/10.1101/569129v1
Protocol Citation: Derek Janssens, Steven Henikoff 2019. CUT&RUN: Targeted in situ genome-wide profiling with high efficiency for low cell numbers. protocols.io https://dx.doi.org/10.17504/protocols.io.zcpf2vn
Manuscript citation:
License: This is an open access protocol distributed under the terms of the Creative Commons Attribution License, which permits unrestricted use, distribution, and reproduction in any medium, provided the original author and source are credited
Protocol status: Working
We use this protocol and it's working
Created: March 19, 2019
Last Modified: May 09, 2019
Protocol Integer ID: 21615
Keywords: chromatin profiling, epigenomics, novel alternative to chromatin immunoprecipitation, micrococcal nuclease, fusion protein, release using nuclease, chromatin immunoprecipitation, supernatant for dna extraction, dna extraction, situ genome, antibody compatibility, premature release of the nuclease, routine epigenomic profiling, sequencing, antibody, activation of tethered mnase, nuclease
Abstract
We previously described a novel alternative to Chromatin Immunoprecipitation, Cleavage Under Targets & Release Using Nuclease (CUT&RUN), in which unfixed permeabilized cells are incubated with antibody, followed by binding of a Protein A-Micrococcal Nuclease (pA/MNase) fusion protein. Upon activation of tethered MNase, the bound complex is excised and released into the supernatant for DNA extraction and sequencing. In the manuscript attached to this version of the protocol, Meers et al. introduce four enhancements to CUT&RUN: 1) a hybrid Protein A-Protein G-MNase construct that expands antibody compatibility; 2) a modified digestion protocol that prevents premature release of the nuclease-bound complex; 3) a calibration strategy based on carry-over of E. coli DNA introduced with the fusion protein; and 4) a novel peak-calling strategy customized for the low-background profiles obtained using CUT&RUN. Here we provide an updated CUT&RUN protocol that incorporates these enhancements, and provides three different options for the CUT&RUN MNase digestion reaction that are helpful to improve data quality or to increase throughput. These new features, coupled with the previously described low-cost, high efficiency, high reproducibility and high-throughput capability of CUT&RUN make it the method of choice for routine epigenomic profiling.
Guidelines
The protocol workflow is as follows:
Day 1, Cells to DNA
Binding cells to beads (Steps 1-8, 30 min)
Permeabilize cells and bind primary antibodies (Steps 9-13, 2.5 hr–overnight, longer incubations provide higher yields)
Bind secondary antibody as required (Steps 14-20, 15 min-1.5 hr)
Bind Protein A-MNase or Protein A/G-MNase fusion protein (Steps 21-26, 1.5 hr)
Chromatin Digestion and Release Option 1: Standard CUT&RUN (Steps 27-37, 1.5 hr)
Chromatin Digestion and Release Option 2: High Ca2+/ Low Salt (Steps 38-47, 1 hr)
Chromatin Digestion and Release Option 3: Direct Ligation (Steps 48-56, 1.5 hr)
Phenol Chloroform Extraction (only required for Chromatin Digest Options 1 and 2) (Steps 57-67, 1.5 hr)
Days 2-4, Library preparation and sequencing
Sample Analysis Pre-Library Prep (optional) (Steps 68-69, 1 hr)
End Repair and Adapter Ligation (Steps 70-78, 3 hr–overnight)
PCR Enrichment of CUT&RUN Libraries (Steps 79-109, 2-3 hr)
CUT&RUN Library Analysis and Sequencing (Steps 110-112, variable timing)
Day 5
Data processing and analysis (Steps 113-114, variable timing)
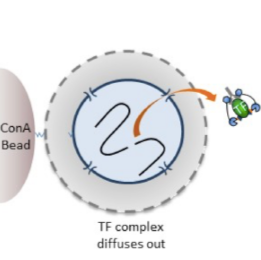
Figure 1: CUT&RUN workflow. A schematic overview of the CUT&RUN protocol. Cells are harvested and bound to concanavalin A-coated magnetic beads. Cell membranes are permeabilized with digitonin to allow the specific antibody to find it's targets. Afer incubation with antibody, beads are briefly washed, and then incubated with pA- or pA/G-MNase. The user then selects one of three different options for the MNase digestion reaction to best fit the needs of their experiment. The first option for digestion is the same as the previously released CUT&RUN protocol, and is refered to as standard CUT&RUN. The second option includes high Ca2+ to compact chromatin and hold it in place during digestion, limiting the amount of MNase that is able to freely diffuse, and reducing the background for targets that are enriched at active chromatin (e.g. H3K27ac). The third option is for direct ligation of Illumina-compatible adapters to the cleaved chromatin, avoiding the DNA puritification steps that are required for options 1 and 2. Regardless of the digestion option that is selected, cells are first chilled to 0 °C, and digestion begins upon addition of Ca2+. Reactions are stopped by chelating away the calcium and the DNA fragments released into solution by cleavage are used to prepare CUT&RUN sequencing libraries.
EQUIPMENT
- Centrifuge Eppendorf 5810, swinging bucket
- Centrifuge Eppendorf 5424, fixed angle rotor
- Centrifuge Eppendorf 5415R, refrigerated fixed angle rotor
- Macsimag magnetic separator (Miltenyi, cat. no. 130-092-168), which allows clean withdrawal of the liquid from the bottom of 1.7 and 2 ml microfuge tubes.
- Vortex mixer (e.g., VWR Vortex Genie)
- Micro-centrifuge (e.g., VWR Model V)
- 1.5-ml microcentrifuge tubes (Genesee, cat. no. 22-282)
- 2-ml microcentrifuge tubes (Axygen, cat. no. MCT-200-C)
- Tube rotator (Labquake, Thermo Fisher)
- Heater block with wells for 1.5-ml microcentrifuge tubes
- Water baths (set to 37°C and 70 °C)
- MaXtract phase-lock microcentrifuge tubes (Qiagen, cat. no. 139046)
- Capillary electrophoresis instrument (e.g. Agilent Tapestation 4200)
- Qubit Fluorometer (Life Technologies, cat. no. Q33216)
INTRODUCTION
Experimental Design
The CUT&RUN method for the in situ targeted cleavage and release of chromatin complexes is straightforward and can be completed in under a day using standard lab equipment. Here we provide a detailed CUT&RUN protocol that now includes various optional modifications to the MNase digestion reaction that can be used to improve data quality or increase throughput in specific situations. One of the strengths of CUT&RUN is that the entire reaction is performed in situ, whereby the antibody and pA- or pA/G-MNase are free to diffuse into the nucleus. The original protocol used nuclei prepared by a combination of hypotonic lysis and treatment of cells with Triton X-100. This has been successful with a number of cell lines, but we have recently adapted the protocol to use cells permeabilized by the non-ionic detergent digitonin, which has been successfully used in other in situ methods, including ChEC-seq and ATAC-seq. Digitonin partitions into membranes and extracts cholesterol. Membranes that lack cholesterol are minimally impacted by digitonin. Nuclear envelopes are relatively devoid of cholesterol compared to plasma membranes. As such, treatment of cells with digitonin represents a robust method for permeabilizing cells without compromising nuclear integrity. The protocol described here uses digitonin, but it is possible that individual experimental situations call for generating intact nuclei by other means, and such nuclei can be prepared by a suitable method, bound to concanavalin A-coated beads as per the protocol provided in Skene and Henikoff (eLife, 2017), and then enter the protocol below at step 9.
One of the limitations of a protocol that has inherently low background and is amenable to low cell numbers is that the amount of DNA recovered can be very low, such that analysis even by sensitive capillary electrophoresis or picogreen assays (e.g. Agilent Tapestation and Qubit) are problematic. In addition, high resolution mapping techniques that cleave a minimal footprint are not suitable to PCR-based analysis of known binding loci, as it is not commonly possible to design ~50 bp PCR amplicons. As such, we recommend using a positive control antibody that targets an abundant epitope and therefore the DNA can be readily detected. We have successfully used a rabbit monoclonal antibody raised against H3K27me3, with capillary electrophoresis showing with the amount of cleaved fragments being proportional to the number of starting cells. A nucleosomal ladder is expected by Tapestation or other sensitive electrophoretic analysis method (Fig. 2), and the use of a monoclonal antibody avoids potential lot-to-lot variation that can complicate troubleshooting. For less abundant epitopes, including many transcription factors, it is harder to detect the cleaved fragments by even sensitive electrophoretic analysis (Supplementary Figure 1). Once the expected digested DNA pattern is observed for the positive control by capillary electrophoresis such as H3K27me3, it is not necessary to sequence this sample. As a negative control, we recommend the use of a non-specific rabbit IgG antibody that will randomly coat the chromatin at low efficiency without sequence bias. We do not recommend a no-antibody control, as the lack of tethering increases the possibility that slight carry-over of pA-MNase will result in preferential fragmentation of hyper-accessible DNA.
In our previously published study, we showed that targeted cleavage occurred within seconds of adding Ca2+ ions, and by virtue of being a sterically regulated tethered reaction, the cleavage pattern was constant over time. However, longer digestion times release more material with no apparent change in the signal-to-noise ratio (Supplementary Figure 2). We therefore recommend digesting for 30 minutes as a starting point that can be tailored based upon epitope abundance and antibody concentration.
Limitations
As is the case with ChIP, the success of CUT&RUN depends in large part on the affinity of the antibody for its target and its specificity under the conditions used for binding. Because antibodies bind to their epitopes in the solid state using CUT&RUN, we would expect that antibodies successfully tested for specificity by immunofluorescence (IF) would be likely to work with CUT&RUN, with the caveat that IF generally involves fixation, whereas formaldehyde fixation decreases the efficiency of CUT&RUN.
In the standard CUT&RUN protocol we recommend allowing the cleaved chromatin complexes to diffuse out of the nuclei, thereby permitting simple isolation of the cut DNA from the supernatant fraction with the undigested genome retained in the intact nuclei. However, it is possible that a chromatin complex is too large to diffuse out or that protein-protein interactions retain the cleaved complex. In such cases, total DNA may be extracted after the digestion. By doing a very simple negative size selection using paramagnetic carboxylated beads (e.g. Agencourt AMPure XP beads) large genomic DNA can be removed prior to preparing CUT&RUN sequencing libraries. In Skene and Henikoff (eLife, 2017) we showed that this strategy was successful for the ~1 MDa yeast RSC complex.
TROUBLESHOOTING
Materials
MATERIALS
10 mM Adenosine 5-Triphosphate (ATP)New England BiolabsCatalog #PO756S
Cell suspension. We have used human K562 cells, Drosophila S2 cells and dissected Drosophila tissues such as brains and imaginal disks, and spheroplasted yeast.
Concanavalin-coated magnetic beads Bangs LaboratoriesCatalog #BP531
Antibody to an epitope of interest. For example, rabbit α-CTCF polyclonal antibody (Millipore 07-729) for mapping 1D and 3D interactions by CUT&RUN
Positive control antibody to an abundant epitope, e.g. α-H3K27me3 rabbit monoclonal antibody (Cell Signaling Technology, cat. no. 9733)
Negative control antibody to an absent epitope, e.g. guinea pig α-rabbit antibody
5% Digitonin Merck Millipore (EMD Millipore)Catalog #300410
Spike-in DNA (e.g., from Saccharomyces cerevisiae micrococcal nuclease-treated chromatin, provided by authors upon request)
Distilled, deionized or RNAse-free H2O (dH2O e.g., Promega, cat. no. P1197)PromegaCatalog #P1197
1 M Manganese Chloride (MnCl2)Merck MilliporeSigma (Sigma-Aldrich)Catalog #203734
1 M Calcium Chloride (CaCl2)Fisher ScientificCatalog #BP510
1 M Potassium Chloride (KCl)Merck MilliporeSigma (Sigma-Aldrich)Catalog #P3911
1 M Hydroxyethyl piperazineethanesulfonic acid pH 7.5 (HEPES (Na ))Merck MilliporeSigma (Sigma-Aldrich)Catalog #H3375
5 M Sodium chloride (NaCl)Merck MilliporeSigma (Sigma-Aldrich)Catalog #S5150-1L
0.5 M Ethylenediaminetetraacetic acid (EDTA)Merck MilliporeSigma (Sigma-Aldrich)Catalog #3002E
0.2 M Ethylene glycol-bis(β-aminoethyl ether)-N,N,N,N-tetraacetic acid (EGTA)Merck MilliporeSigma (Sigma-Aldrich)Catalog #E3889
Roche Complete Protease Inhibitor EDTA-Free tablets Merck MilliporeSigma (Sigma-Aldrich)Catalog #5056489001
RNase A, DNase and protease-free (10 mg/ml)Thermo Fisher ScientificCatalog #EN0531
Agencourt AMPure XP magnetic beads Beckman CoulterCatalog #A63880
10% Sodium dodecyl sulfate (SDS)Merck MilliporeSigma (Sigma-Aldrich)Catalog #L4509
Proteinase KThermo Fisher ScientificCatalog #EO0492
Phenol-chloroform-isoamyl alcohol 25:24:1 (PCI)Invitrogen - Thermo FisherCatalog #15593049
ChloroformMerck MilliporeSigma (Sigma-Aldrich)Catalog #366919-1L
1 M Tris-HCl pH 8.0
Ethanol Decon LabsCatalog #2716
Qubit dsDNA HS kit Life TechnologiesCatalog #Q32851
10mM dNTPsKapa BiosystemsCatalog #KK1017
T4 Polynucleotide Kinase - 500 unitsNew England BiolabsCatalog #M0201S
T4 DNA polymerseInvitrogen - Thermo FisherCatalog #18005025
Taq DNA polymeraseThermo ScientificCatalog #EP0401
2X Rapid ligase bufferCatalog #B101L
Enzymatics DNA ligaseCatalog #L6030-HC-L
5X KAPA bufferKapa BiosystemsCatalog #KK2502
KAPA HS HIFI polymeraseKapa BiosystemsCatalog #KK2502
10X NEB T4 DNA ligase bufferNew England Biolabs
40% PEG 4000Merck MilliporeSigma (Sigma-Aldrich)Catalog #81242
40% PEG 8000Merck MilliporeSigma (Sigma-Aldrich)Catalog #202452
Protein A/G–Micrococcal Nuclease (pA/G-MNase) fusion protein (plasmid for protein prep available from Addgene ID:123461). Store in 50% glycerol at -20 oC.addgeneCatalog #123461
Protein A–Micrococcal Nuclease (pA-MNase) fusion protein (plasmid for protein prep available from Addgene ID: 86973). Store in 50% glycerol at -20 oC.
20 mg/ml GlycogenMerck MilliporeSigma (Sigma-Aldrich)Catalog #10930193001
5g Spermidine (mix up to 17.2 mL in water to make 2M stock and store @ -20 oC)Merck MilliporeSigma (Sigma-Aldrich)Catalog ##S0266-5G
In this protocol we provide an optional library prep strategy for Illumina sequencing that uses TruSeq-Y Adapters with a free 3'T overhang. Alternatively, many users have also had success with the NEBNext Ultra I DNA Library Kit (E7645) following a protocl developed by Nan Liu in Stuart Orkin's lab (dx.doi.org/10.17504/protocols.io.wvgfe3w). To follow the library prep protocol described here the following oligos can be ordered from any company that provides custom oligo synthesis (e.g. IDT or Sigma-Aldrich):
TruSeq Universal Adapter (PAGE purification):
AATGATACGGCGACCACCGAGATCTACACTCTTTCCCTACACGACGCTCTTCCGATC*T
TruSeq Indexed Adapters (PAGE purification):
P-GATCGGAAGAGCACACGTCTGAACTCCAGTCAC(INDEX)ATCTCGTATGCCGTCTTCTGCTT*G
Adapter master stocks should be prepared by annealing the TruSeq Universal adapter to each of the TruSeq Indexed Adapters individually by mixing them at a concentration of 25 µM, and then heating them to 100 0C and allowing them to slowly cool either at RT on a bench top or in a thermocycler (1 degree per minute).
P5 primer (HPLC purification):
AATGATACGGCGACCACCGA*G
P7 primer (HPLC purification):
CAAGCAGAAGACGGCATACGA*G
(* = phosphorothioate bond; P = phosphate group; INDEX = 6 nucleotide barcode)
Troubleshooting
Safety warnings
- Digitonin is toxic and care should be taken especially when weighing out the powder. A digitonin stock may be prepared by dissolving in dimethylsulfoxide (DMSO), but be aware that DMSO can absorb through the skin.
Before start
REAGENT SETUP
5% Digitonin To reconstitute enough digitonin for an experiment, weigh out the powder in a 2 mL microcentrifuge tube, boil water in a small beaker in a microwave oven, and pipette in and out to warm the 1000 μL pipette tip. Pipette the hot water into the tube with the digitonin powder to make 5% (w/v), close the cap and quickly vortex on full until the digitonin is completely dissolved. If refrigerated, this stock can be used within a week, but will need reheating as the digitonin slowly precipitates. The effectiveness of digitonin varies between batches, so testing permeability of Trypan blue is recommended to determine the concentration to use for a cell type. We have obtained excellent results for K562 cells with 0.02-0.1% digitonin.
- NOTE: The 5% digitonin stock may also be prepared by dissolving in dimethylsulfoxide (DMSO), and can then be stored at -20 °C for up to 6 months. Be aware that DMSO can absorb through the skin.
- CAUTION: Digitonin is toxic and care should be taken especially when weighing out the powder.
Binding buffer: Mix 20 mL of Binding Buffer in a 50 mL conical tube. Store the buffer at 4 °C for up to 6 months.
Activate Concanavalin A-coated beads in Binding Buffer: Gently resuspend and withdraw enough of the slurry such that there will be 10 μL for each final sample and/or digestion time point. Transfer into 1.5 mL Binding buffer in a 2 ml tube. Place the tube on a magnet stand to clear (30 s to 2 min). Withdraw the liquid, and remove from the magnet stand. Add 1.5 mL Binding buffer, mix by inversion or gentle pipetting, remove liquid from the cap and side with a quick pulse on a microcentrifuge. Resuspend in a volume of Binding buffer equal to the volume of bead slurry (10 μL per final sample).
Wash buffer: Mix 50 mL of Wash Buffer. This buffer can be stored at 4 °C for up to 1 week, however, Roche Complete Protease Inhibitor tablet should be added fresh on the day of use.
- NOTE: A concentration of salt that is in the physiological range avoids stress when washing the cells and mixing with beads. Spermidine in the wash buffer is intended to compensate for removal of Mg2+ during incubation in the Antibody Buffer, which might otherwise affect chromatin properties.
Dig-wash buffer: Mix 150-600 µL 5% (wt/vol) digitonin with 30 mL Wash Buffer for a final concentration of digitonin between 0.025% and 0.1% (wt/vol). Store this buffer on ice or at 4 °C for up to 1 day, and vortex before use.
- NOTE: The effectiveness of digitonin varies between batches, so testing for full permeability of Trypan blue is recommended to determine the concentration to use for a cell type. We have obtained excellent results for H1 and K562 cells with 0.05% digitonin (300 µL 5% (wt/vol) digitonin in 30 mL Wash Buffer). For simplicity, we use this same buffer for all steps starting from the incubation in primary antibody until the chromatin digestion.
Antibody buffer: Mix 8 μL 0.5 M EDTA with 2 mL Dig-wash buffer and place on ice.
- NOTE: The presence of EDTA during antibody treatment removes excess divalent cations used to activate the Concanavalin A-coated beads, as well as endogenous cations from the cells of interest. This serves to halt metabolic processes, stop endogenous DNAse activity, and prevent carry-over of Ca2+ from the Binding Buffer that might prematurely initiate strand cleavage after addition of pA-MNase. Washing out the EDTA before pA-MNase addition avoids inactivating the enzyme.
Protocol Option 1: Standard CUT&RUN specific reagents
2X STOP Buffer: Mix 5 mL of 2X STOP Buffer. Store the buffer at 4 °C for up to 1 week.
- CRITICAL STEP: Adding heterologous spike-in DNA to the STOP Buffer can be useful for comparison of DNA yields between samples. The total number of mapped spike-in reads can then be used as a normalization factor, where the amount of spike-in reads is inversly proportional to the DNA yeild from the sample. The spike-in DNA should be fragmented down to ~200 bp mean size, for example, an MNase-treated sample of mononucleosome-sized fragments. When starting with low cell numbers (i.e. 100 - 10,000 cells) very little spike-in DNA is required, we recommend a final concentration of 2 pg/mL in the STOP buffer. For samples with high cell numbers (i.e. 10,000 -1 million cells) more spike-in DNA is required to obtain sufficient reads and we recommend 100 pg/mL in the STOP Buffer. Alternatively, E. coli DNA that is carried-over from the production of the fusion protein can also serve as a spike-in for sample calibrations, in which case no additional heterologous spike-in needs to be included in the STOP Buffer.
Protocol Option 2: High Ca2+ / Low Salt specific reagents
Low-Salt Rinse Buffer: Mix 20 mL of Low-Salt Rinse Buffer. Store the buffer at 4 °C for up to 1 week.
Incubation Buffer: Mix 4 mL of Incubation Buffer. Store the buffer at 4 °C for up to 1 week. Briefly chill on ice before use.
STOP Buffer: Mix 5 mL of STOP Buffer. Store the buffer at 4 °C for up to 1 week.
CRITICAL STEP: Adding heterologous spike-in DNA to the STOP Buffer can be useful for comparison of DNA yields between samples. For recommended concentrations see 2X STOP Buffer in Protocol Option 1 specific reagents. Alternatively, E. coli DNA that is carried-over from the production of the fusion protein can also serve as a Spike-In for sample calibrations, in which case no additional heterologous spike-in needs to be included in the STOP Buffer.
Protocol Option 3: Direct Ligation specific reagents
1X pA-MNase Reaction Mix: Prepare 1.2 mL of 1X pA-MNase Reaction Mix. Store the buffer at 4 °C for up to 1 week.
4X STOP Buffer: Mix 600 µL of 4X STOP Buffer. Store the buffer at 4 °C for up to 1 week.
CRITICAL STEP: Adding heterologous spike-in DNA to the STOP Buffer can be useful for comparison of DNA yields between samples. For recommended concentrations see 2X STOP Buffer in Protocol Option 1 specific reagents. Alternatively, E. coli DNA that is carried-over from the production of the fusion protein can also serve as a Spike-In for sample calibrations, in which case no additional heterologous spike-in needs to be included in the STOP Buffer.
Binding cells to beads (~30 min)
Harvest fresh culture(s) at room temperature and count cells. The same protocol can be used for up to 500,000 mammalian cells per sample and/or digestion time point.
Note
CRITICAL STEP: All steps prior to the addition of antibody are performed at room temperature to minimize stress on the cells. Because it is crucial that DNA breakage is minimized throughout the protocol, we recommend that cavitation during resuspension and vigorous vortexing be avoided.
Note
PAUSE POINT: If necessary, cells can be cryopreserved in 10% DMSO using a Mr. Frosty isopropyl alcohol chamber. We do not recommend flash freezing, as this can cause background DNA breakage that may impact final data quality.
Centrifuge 3 min 600 x g at room temperature and withdraw liquid.
00:03:00 Centrifugation
Resuspend in 1.5 mL room temperature Wash buffer by gently pipetting and transfer if necessary to a 2 mL tube.
1.5 µL Wash buffer
Centrifuge 3 min 600 x g at room temperature and withdraw liquid.
00:03:00 Centrifugation
Repeat steps 3 and 4 two more times.
Repeat Dig-wash steps
Note
CRITICAL STEP: Thorough washing removes free sugars and other molecules that can compete for binding to the Concanavalin A coated-beads, ensuring efficient binding and recovery of the cells of interest.
Resuspend in 1 mL room temperature Wash Buffer by gently pipetting.
While gently vortexing the cells at room temperature, add the ConA-coated magnetic bead slurry.
Rotate 5-10 min at room temperature.
00:10:00 Rotation
Permeabilize cells and bind primary antibodies (2.5 hours - overnight)
Mix well by vigorous inversion to ensure the bead-bound cells are in a homogenous suspension and divide into aliquots in 1.5-mL tubes, one for each antibody to be used.
Note
NOTE: Some users have experienced issues with ConA beads sticking to the sides of the tube and coming out of solution during antibody incubation steps. In this case, 0.6-mL Lo-bind microcentrifuge tubes can be used, and subsequent Dig-wash volumes reduced to 300 µL. However, when bound to low cell numbers (e.g. <100K) the ConA beads will be extremely slippery on the sides of lo-bind tubes, and so great care must be taken while removing solutions on the magnet during wash steps etc. to avoid losing the sample.
Place on the magnet stand to clear and pull off the liquid.
Place each tube at a low angle on the vortex mixer set to low (~1100 rpm) and squirt 50-150 μL of the Antibody buffer per sample along the side while gently vortexing to allow the solution to dislodge most or all of the beads. Tap to dislodge the remaining beads150 µL Antibody buffer
Note
NOTE: Permeabilizing the cells with digitonin and chelating divalent cations with EDTA serves to quickly halt metabolic processes and prevent endogenous DNAse activity. This helps to preserve the native chromatin state and reduce background noise in the final CUT&RUN libraries. Thus, it is recommended to work quickly to get cells into Antibody Buffer.
Note
CRITICAL STEP: To evaluate success of the procedure without requiring sequencing, include in parallel a positive control antibody (e.g. anti-H3K27me3) and a negative control antibody (e.g. rabbit anti-mouse IgG). Do not include a no-antibody control, as the lack of tethering may allow any unbound pA-MNase to act as a “time-bomb” and digest accessible DNA, resulting in a background of DNA-accessible sites.
Mix in the primary antibody to a final concentration of 1:100 or to the manufacturer’s recommended concentration for immunofluorescence.
Note
CRITICAL STEP: To evaluate success of the procedure without requiring sequencing, include in parallel a positive control antibody (e.g. anti-H3K27me3) and a negative control antibody (e.g. rabbit anti-mouse IgG). Do not include a no-antibody control, as the lack of tethering may allow any unbound pA-MNase to act as a “time-bomb” and digest accessible DNA, resulting in a background of DNA-accessible sites.
Place on a nutator or tube rotator at room temperature for ~2 hr or at 4 °C overnight.
02:00:00 Nutator or tube rotator at RT
Note
PAUSE POINT: Antibody incubation may proceed overnight at 4 °C.
Note
NOTE: When using on the order of 500K cells per 10 µL beads it is normal for beads to clump or stick to the side during the incubation. First, attempt to resuspend stuck beads by inverting the tube. If beads remain stuck to the side, use a pipette tip to push beads back into solution.
Note
TROUBLESHOOTING
Bind secondary antibody as required (15 min to 1.5 hours)
Remove liquid from the cap and side with a quick pulse on a micro-centrifuge. Place on the magnet stand to clear (~30 s) and pull off all of the liquid.
00:00:30 Magnet stand
Note
CRITICAL STEP: The binding efficiency of Protein A and Protein A/G to the primary antibody depends on host species and IgG isotype. For example, Protein A binds well to rabbit and guinea pig IgG but poorly to mouse and goat IgG, and so for these latter antibodies a secondary antibody, such as rabbit α-mouse is recommended. Although Protein A/G increases antibody compatibility relative to Protein A, in some cases a secondary antibody may still be necessary.
Note
CRITICAL STEP: After mixing, but before placing a tube on the magnet stand, a very quick spin on a micro-centrifuge (no more than 100 x g) will minimize carry-over of antibody and pA-MN that could result in overall background cleavages during the digestion step.
Add 1 mL Dig-wash buffer, mix by inversion, or by gentle pipetting using a 1 mL tip if clumps persist.
1 mL Dig-wash buffer
Repeat Dig-wash steps 14-15.
Repeat Dig-wash steps
Remove liquid from the cap and side with a quick pulse on a micro-centrifuge. Place on the magnet stand to clear (~30 s) and pull off all of the liquid.
00:00:30 Magnet stand
Place each tube at a low angle on the vortex mixer set to low (~1100 rpm) and squirt 150 μL of the Dig-wash buffer per sample and/or digestion time point along the side while gently vortexing to allow the solution to dislodge most or all of the beads. Tap to dislodge the remaining beads.
150 µL Dig-Wash Buffer (per sample or digestion time point)
Add secondary antibody to a final concentration of 1:100 or to the manufacturer’s recommended concentration for immunofluorescence.
Place on the nutator or tube rotator at 4 °C for ~1 hr.
01:00:00 Nutator or tube rotator at 4 °C
Bind Protein A-MNase or Protein A/G-MNase fusion protein (1.5 hours)
Remove liquid from the cap and side with a quick pulse on a micro-centrifuge. Place on the magnet stand (~30 sec) to clear and pull off all of the liquid.
00:00:30 Magnet stand
Add 1 mL Dig-Wash buffer, mix by inversion, or by gentle pipetting if clumps persist.
1 mL Dig-Wash buffer
Repeat Dig-wash steps 21-22.
Repeat Dig-wash steps
Remove liquid from the cap and side with a quick pulse on a micro-centrifuge. Place on the magnet stand to clear (~30 s) and pull off all of the liquid.
00:00:30 Magnet stand
Place each tube at a low angle on the vortex mixer set to low (~1100 rpm). Squirt 150 μL of the Protein A-MNase or Protein A/G-MNase fusion protein at 700 ng/mL (e.g., 1:200 of a 140 µg/mL glycerol stock) in Dig-wash buffer (per sample and/or digestion time point) along the side while gently vortexing to allow the solution to dislodge most or all of the beads. Tap to dislodge the remaining beads.
150 µL Protein A-MNase or Protein A/G-MNase (700 ng/mL) in Dig-wash buffer
Place on the nutator or tube rotator at 4 °C for ~1 hr.
01:00:00 Nutator or tube rotator at 4 °C
Chromatin Digestion and Release Option 1: Standard CUT&RUN (1.5 hours)
Note
NOTE: The Standard CUT&RUN protocol is suitable for most target proteins and is typically the best option to start with for untested antibodies.
Remove liquid from the cap and side with a quick pulse on a micro-centrifuge. Place on the magnet stand (~30 s) to clear and pull off all of the liquid.
00:00:30 Magnet stand
Add 1 mL Dig-wash buffer, mix by inversion, or by gentle pipetting if clumps persist.
1 mL Dig-wash buffer
Repeat Dig-wash steps 27-28.
Repeat Dig-wash steps
Remove liquid from the cap and side with a quick pulse on a micro-centrifuge. Place on the magnet stand to clear (~30 s) and pull off all of the liquid.
00:00:30 Magnet stand
Place each tube at a low angle on the vortex mixer set to low (~1100 rpm) and add 100 μL of the Dig-wash buffer (per sample and/or digestion time point) along the side while gently vortexing to allow the solution to dislodge most or all of the beads. Tap to dislodge the remaining beads.
100 µL Dig-wash buffer (per sample or digestion time point)
Insert tubes into the 1.5 mL wells of a heater block sitting in wet ice to chill down to 0 °C.
0 °C
Remove each tube from the block, mix in 2 μL 100 mM CaCl2 (per sample and/or digestion time point), diluted 1:10 from a 1 M stock, with gentle vortexing and immediately replace the tube in the 0 °C block
2 µL 100 mM CaCl2 (per sample or digestion time point) 0 °C
Incubate at 0 °C for the desired digestion time (default is 30 min).
00:30:00 Incubation
0 °C Incubation
Note
CRITICAL STEP: MNase binds DNA but only cleaves when Ca++ is present, so that digestion is a zero-order reaction that seems to be less temperature-dependent than the subsequent diffusion of released pA-MNase-bound particles that can digest accessible regions of the genome. Cleavage and release of particles in most of the cell population can be obtained at 0 °C while minimizing background cleavages attributable to diffusion. We have found that digestion at ambient temperature or higher results in unacceptable background cleavage levels.
Add 100 μL 2X STOP Buffer and mix by gentle vortexing. When there are multiple digestion time points, remove 100 μL and add to a new tube containing 100 μL 2X STOP Buffer and mix by gentle vortexing.
100 µL 2XSTOP
Note
CRITICAL STEP: Heterologous spike-in DNA should be present in the 2X STOP Buffer to calibrate DNA amounts, for example to compare treatments or digestion time points. This is especially important for CUT&RUN, as there is too little background cleavage for normalization of samples. Alternatively, mapping to E. coli carry-over DNA from the pA-MNase and pA/G-MNase that gets fragmented during digestion suffices for calibration.
Incubate 30 min @ 37 °C to release CUT&RUN fragments from the insoluble nuclear chromatin.
00:30:00 Incubation
37 °C Incubation
Place on the magnet stand to clear. Cleanly transfer the supernatant containing digested chromatin to a fresh 1.5-mL microcentrifuge tube and proceed with Phenol Chloroform Extraction (Step 57).
200 µL STOP w/ Chromatin
Note
NOTE: When performing CUT&RUN using untested antibodies, following removal of the STOP buffer w/ Chromatin it is a good idea to spin down and freeze the ConA bead-bound cells containing the insoluble nuclear chromatin that is left behind after MNase digestion. These cells may be useful for troubleshooting in cases where the user suspects chromatin solubility issues may be limiting yields. By preparing a sequencing library from the total DNA extracted from the "left-over" ConA bead-bound material as described in Skene and Henikoff (eLife, 2017), and comparing the sequencing data, the user can then determine if the majority of the cleaved DNA was in fact being retained in the nuclear fraction.
Chromatin Digestion and Release Option 2: High Ca2+ / Low Salt (1 hour)
Note
NOTE: The modified High Ca2+ / Low Salt CUT&RUN digestion protocol prevents premature release of the nuclease-bound complex, thereby preventing premature diffusion of the pA- or pA/G-MNase complex which has the potential to cause non-specific cleavage and increase the background signal. This option is ideal for targets that are prevalent at regions of active chromatin, as well as optimizing conditions for an antibody that appears to yield some specific signal using the standard CUT&RUN protocol but has unacceptably high levels of background signal.
Remove liquid from the cap and side with a quick pulse on a micro-centrifuge. Place on the magnet stand (~30 sec) to clear and pull off all of the liquid.
00:00:30 Magnet stand
Add 1 mL Dig-wash buffer, mix by inversion, or by gentle pipetting if clumps persist.
1 mL Dig-wash buffer
Repeat Dig-wash steps 38-39.
Repeat Dig-wash steps
Remove liquid from the cap and side with a quick pulse on a micro-centrifuge. Place on the magnet stand to clear and pull off all of the liquid. Add 1 mL Low-Salt Rinse Buffer, mix by inversion, or by gentle pipetting if clumps persist, and remove liquid from cap and side with a quick pulse on a micro-centrifuge.
1 mL Low-Salt Rinse buffer
Note
CRITICAL STEP: If multiple digestion time points are desired per sample, split samples into multiple tubes for MNase digestion and STOP steps, one tube for each time point.
Place on the magnet stand to clear (~30 s) and pull off all of the liquid.
00:00:30 Magnet stand
Place each tube at a low angle on the vortex mixer set to low (~1100 rpm) and add 200 μL of ice cold Incubation Buffer along the side while gently vortexing to allow the solution to dislodge most or all of the beads. Tap to dislodge the remaining beads.
200 µL Incubation buffer
0 °C
Incubate at 0 °C for the desired digestion time (default is 5 min).
00:05:00 Incubation
Note
CRITICAL STEP: MNase binds DNA but only cleaves when Ca++ is present, so that digestion is a zero-order reaction that seems to be less temperature-dependent than the subsequent diffusion of released pA-MNase-bound particles that can digest accessible regions of the genome. Cleavage and release of particles in most of the cell population can be obtained at 0 °C while minimizing background cleavages attributable to diffusion. We have found that digestion at ambient temperature or higher results in unacceptable background cleavage levels.
0 °C Incubation
Place on (cold) magnet stand and allow to clear for ≥10 s and remove liquid. Add 200 μL STOP buffer and mix by gentle vortexing.
200 µL STOP
Note
NOTE: The 10 mM Ca++ in the Incubation Buffer will compact chromatin and prevent diffusion out of the nucleus during digestion. Thus, following the 5 min digestion, the Incubation Buffer will contain very little pA-MNase digested chromatin. However, to be safe, the Incubation Buffer can be saved for potential future analysis. The addition of 200 μL STOP buffer will then chelate away remaining Ca++ and allow the digested chromatin fragments to freely diffuse out of the cells.
Note
CRITICAL STEP: Heterologous spike-in DNA may be present in the STOP buffer to calibrate DNA amounts, for example to compare treatments or digestion time points. Alternatively, mapping to E. coli carry-over DNA from the pA-MNase and pA/G-MNase that gets fragmented during digestion suffices for calibration.
Incubate 30 min @ 37 °C to release CUT&RUN fragments from the insoluble nuclear chromatin.
00:30:00 Incubation
37 °C Incubation
Place on the magnet stand to clear. Cleanly transfer the supernatant containing digested chromatin to a fresh 1.5-mL microcentrifuge tube and proceed with Phenol Chloroform Extraction (Step 57).
200 µL STOP w/ Chromatin
Note
NOTE: When performing CUT&RUN using untested antibodies, following removal of the STOP buffer w/ Chromatin it is a good idea to spin down and freeze the ConA bead-bound cells containing the insoluble nuclear chromatin that is left behind after MNase digestion. These cells may be useful for troubleshooting in cases where the user suspects chromatin solubility issues may be limiting yields. By preparing a sequencing library from the total DNA extracted from the "left-over" ConA bead-bound material as described in Skene and Henikoff (eLife, 2017), and comparing the sequencing data, the user can then determine if the majority of the cleaved DNA was in fact being retained in the nuclear fraction.
Chromatin Digestion and Release Option 3: Direct Ligation (1.5 hours)
Note
NOTE: The CUT&RUN w/ Direct Ligation protocol is ideal for users who want to work quickly to prepare libraries, as it bypasses the phenol chloroform extraction and allows the user to potentially go from live cells to completed sequencing ready libraries in less than 12 hrs. This protocol is essentially a manual version of the AutoCUT&RUN protocol (https://www.protocols.io/view/autocut-run-genome-wide-profiling-of-chromatin-pro-ufeetje). Thus, samples processed manually using CUT&RUN w/ Direct Ligation are likley to be the most comparable to samples prepared using the automated format.
Remove liquid from the cap and side with a quick pulse on a micro-centrifuge. Place on the magnet stand to clear (~30 sec) and pull off all of the liquid.
00:00:30 Magnet stand
Add 1 mL Dig-wash buffer, mix by inversion, or by gentle pipetting if clumps persist.
1 mL Dig-wash buffer
Repeat Dig-wash steps 48-49.
Repeat Dig-wash steps
Remove liquid from the cap and side with a quick pulse on a micro-centrifuge. Place on the magnet stand to clear (~30 s) and pull off all of the liquid.
00:00:30 Magnet stand
Place each tube at a low angle on the vortex mixer set to low (~1100 rpm) and add 24 μL of ice cold 1X pA-MNase Reaction Mix (per sample and/or digestion time point) along the side while gently vortexing to allow the solution to dislodge most or all of the beads. Tap to dislodge the remaining beads.
24 µL 1X pA-MNase Reaction Mix
0 °C
Note
NOTE: Significantly reducing the volume during the MNase reaction and STOP allows the chromatin that is released into the supernatant to serve as input for End Repair and Adapter Ligation steps without requiring phenol chloroform extraction.
Insert tubes into the 1.5 ml wells of a heater block sitting in wet ice to chill down to 0 °C. Incubate at 0 °C for the desired digestion time (default is 30 min).
00:30:00 Incubation
0 °C Incubation
Note
CRITICAL STEP: MNase binds DNA but only cleaves when Ca++ is present, so that digestion is a zero-order reaction that seems to be less temperature-dependent than the subsequent diffusion of released pA-MNase-bound particles that can digest accessible regions of the genome. Cleavage and release of particles in most of the cell population can be obtained at 0 °C while minimizing background cleavages attributable to diffusion. We have found that digestion at ambient temperature or higher results in unacceptable background cleavage levels.
Add 8 μL 4X STOP Buffer and mix by gentle vortexing. When there are multiple time points, remove 24 μL and add to a new tube containing 8 μL 4X STOP Buffer and mix by gentle vortexing.
8 µL 4X STOP Buffer
Note
CRITICAL STEP: Heterologous spike-in DNA may be present in the STOP buffer to calibrate DNA amounts, for example to compare treatments or digestion time points. Alternatively, mapping to E. coli carry-over DNA from the pA-MNase and pA/G-MNase that gets fragmented during digestion suffices for calibration.
Incubate 30 min @ 37 °C to release CUT&RUN fragments from the insoluble nuclear chromatin.
00:30:00 Incubation
37 °C Incubation
Place on the magnet stand to clear. Cleanly transfer 30 μL of the supernatant containing digested chromatin to a fresh 0.6 mL Low-Bind microcentrifuge tube, and immediately proceed with End Repair and Adapter Ligation (Step 70).
30 µL STOP w/ Chromatin
Note
NOTE: When performing CUT&RUN using untested antibodies, following removal of the STOP buffer w/ Chromatin it is a good idea to spin down and freeze the ConA bead-bound cells containing the insoluble nuclear chromatin that is left behind after MNase digestion. These cells may be useful for troubleshooting in cases where the user suspects chromatin solubility issues may be limiting yields. By preparing a sequencing library from the total DNA extracted from the "left-over" ConA bead-bound material as described in Skene and Henikoff (eLife, 2017), and comparing the sequencing data, the user can then determine if the majority of the cleaved DNA was in fact being retained in the nuclear fraction.
Phenol Chloroform Extraction (~1.5 hours)
To each sample add 2 μL 10% SDS (to 0.1%), and 2.5 μL Proteinase K (20 mg/ml). Mix by inversion and incubate 1 hr @ 50 °C.
2 µL 10% SDS (to 0.1%)/sample
2.5 µL Proteinase K (20 mg/ml)/sample
50 °C Incubation
01:00:00 Incubation
Note
NOTE: If you are running protocol option 3 (Direct Ligation) skip this section.
Add an equal volume of Phenol Chloroform to the sample (e.g. to 200 µL sample add 200 µL Phenol Chloroform). Mix by full-speed vortexing ~2 s.
200 µL PCl
00:00:02 Vortexing
Transfer to a phase-lock tube (e.g., Qiagen MaXtract), and centrifuge 5 min, room temperature @ 16,000 x g.
00:05:00 Centrifugation
Add an equivalent volume of chloroform to the initial sample volume (e.g. for a 200 µL starting sample volume add 200 µL chloroform). Invert ~10X to mix and then centrifuge 5 min, room temperature @ 16,000 x g.
200 µL Chloroform
00:05:00 Centrifugation
Remove the top liquid phase by pipetting to a fresh tube containing 2 μL 2 mg/mL glycogen (diluted 1:10 from 20 mg/mL glycogen stock).
2 µL 2 mg/ml glycogen
Add 500 μL 100% ethanol and mix by vortexing or tube inversion.
500 µL 100% ethanol
Chill on ice and centrifuge 10 min, 4 °C @ 16,000 x g.
00:10:00 Centrifugation
4 °C Centrifugation
Pour off the liquid and drain on a paper towel.
Rinse the pellet in 1 ml 100% ethanol and centrifuge 1 min, 4 °C @ 16,000 x g.
1 µL 100% ethanol
00:01:00 Centrifugation
4 °C Centrifugation
Carefully pour off the liquid and drain on a paper towel. Air dry.
00:05:00 Air Dry
When the pellet is dry, dissolve in 30-50 μL 1 mM Tris-HCl pH 8 0.1 mM EDTA, then transfer to a new 0.6 mL Lo-Bind microcentrifuge tube.
30 µL 1 mM Tris-HCl pH 8 0.1 mM EDTA
Sample Analysis Pre-Library Prep (~1 hour)
Optional: Quantify 1-2 μL, for example using fluorescence detection with a Qubit instrument.
Note
NOTE: If running protocol option 3 (Direct Ligation) skip this step as the STOP buffer is not a suitable solution for either Qubit or TapeStation analysis.
Note
TROUBLESHOOTING
Optional: Evaluate the presence of cleaved fragments and the size distribution by capillary electrophoresis with fluorescence detection, for example using a Tapestation instrument.
Note
CRITICAL STEP: Some long undigested DNA will leak through, and this is what will dominate the Qubit fluorescence for CUT&RUN of typical transcription factors. For these, the targeted DNA recovered is too low in amount and too small in size to be detected by gel analysis or even by Tapestation. In such cases it may be necessary to make a PCR-amplified library to quantify by Tapestation or Bioanalyzer analysis.
Note
TROUBLESHOOTING
End Repair and Adapter Ligation (3 hours- overnight)
Note
NOTE: Here we provide a version of the Henikoff lab in house library prep strategy for Illumina sequencing that uses TruSeq-Y Adapters with a free 3'T overhang. Alternatively, many users have also had success with the NEBNext Ultra I DNA Library Kit (E7645) following a protocl developed by Nan Liu in Stuart Orkin's lab (dx.doi.org/10.17504/protocols.io.wvgfe3w).
Prepare 4X End Repair and A-tailing (ERA) buffer (10 µL/sample). Keep on Ice until use.
Add 10 µL 4X ERA buffer to each 30 µL sample and mix by pipetting up and down 5 times.
10 µL 4X ERA
Place in a thermocycler that has been pre-cooled to 12 °C and run the following program with heated lid for temp >20 °C:
Note
CRITICAL STEP: The 58 °C, 45 min dA-Tailing step is optimized to prevent short fragments (30-120bp) from denaturing, while still heat inactivating the exonuclease activity of the T4 DNA Polymerase.
Remove pre-annealed 0.15 µM TruSeq adapter from freezer and allow to thaw on ice.
Add 5 µL of 0.15 µM TruSeq adapter to each sample.
5 µL Adapters
Note
CRITICAL STEP: To facilitate multiplexing during sequencing each adapter includes a six nucleotide index or “barcode”. For subsequent data analysis make sure to keep track of which adapter is used for each sample.
Prepare 2X Rapid Ligase solution (40 µL per sample). Keep on ice until use.
Note
NOTE: Measure volumes carefully as the Enzymatics ligase buffer solution is very viscous. Prior to use pipette up and down 10X to ensure adequate mixing
Add 40 µL 2X Rapid Ligase solution to each sample and mix well by pipetting up and down 10 times.
40 µL 2X Rapid Ligase solution
Place in a thermocycler that has been pre-cooled to 20 °C and incubate at 20 °C for 20-30 min. Following incubation proceed with Proteinase K digestion immediately.
Add 2 µL 10% SDS and 2 µL Proteinase K (20 mg/mL) to each sample. Mix well by vortexing and incubate at 37 °C for 1 hr-overnight.
2 µL 10% SDS
2 µL ProK (20mg/mL)
37 °C
01:00:00 Incubation
Note
PAUSE POINT: The Proteinase K digest can proceed at 37 °C overnight. Also, if desired, the adapter ligated, de-proteinated DNA can then be frozen and stored at -20 °C for extended periods.
PCR Enrichment of CUT&RUN Libraries (2-3 hours)
Note
NOTE: Two rounds of Ampure Bead Cleanup are performed prior to PCR amplification to remove un-ligated, and self-ligated adapter as well as unwanted protein, PEG, and salt.
Remove Ampure Bead Slurry from refrigerator, resuspend beads by vortexing and allow to equilibrate to room temperature before using.
Round 1: add 1.0 X the volume of Ampure Beads (e.g. to 85 µL sample add 85 µL Ampure Beads) and mix well by pipetting up and down 10 times. Incubate at room temperature for 5-10 min to allow beads to bind DNA.
85 µL Ampure Beads
00:08:00 Incubation
Place on magnetic stand and allow to clear for 5 min. Without disturbing the beads remove liquid and discard.
00:05:00 Magnet Stand
180 µL Liquid Waste
Without disturbing the beads add 200 µL 80% EtOH solution and incubate for 30 seconds.
200 µL 80% EtOH
00:00:30 Incubation
Leave the sample on the magnetic stand and remove and discard EtOH.
200 µL EtOH Waste
Repeat steps 82-83 to wash the beads a second time with 80% EtOH. Then carefully remove residual EtOH, and air-dry beads for 5 min.
00:05:00 Air-Dry
Remove tube from the magnet, add 50 µL 10 mM Tris-HCl pH 8, and pipette up and down 10X to resuspend beads. Incubate 5-10 min to allow DNA to elute off beads.
50 µL 10 mM Tris-HCl pH 8
00:05:00 Incubation
Prepare 25-50 mL of HXP Buffer (20% PEG 8000, 2.5 M NaCl), by mixing equal volumes of 40% PEG 8000 (wt/vl) and 5 M NaCl. HXP Buffer can be stored at 4 °C for up to two weeks.
Note
NOTE: Once mixed with NaCl, PEG becomes light sensitive and slowly degrades over time.
Round 2: To rebind the DNA to beads for a second clean up add 1.2 X the volume of HXP Buffer to DNA + beads (e.g. to 50 µL sample add 60 µL HXP Buffer) and mix well by pipetting up and down 10 times. Incubate at room temperature for 5-10 min to allow beads to bind DNA.
60 µL HXP Buffer
00:08:00 Incubation
Place on magnetic stand and allow to clear for 5 min. Without disturbing the beads remove liquid and discard.
00:05:00 Magnet Stand
115 µL Liquid Waste
Without disturbing the beads add 200 µL 80% EtOH solution and incubate for 30 seconds.
200 µL 80% EtOH
00:00:30 Incubation
Leave the sample on the magnetic stand and remove and discard EtOH.
200 µL EtOH Waste
Repeat steps 89-90 to wash the beads a second time with 80% EtOH. Then carefully remove residual EtOH, and Air-Dry beads for 5 min.
00:05:00 Air-Dry
Remove tube from the magnet, add 35 µL 10 mM Tris-HCl pH 8, and pipette up and down 10X to resuspend beads. Incubate 5-10 min to allow DNA to elute off beads.
35 µL 10 mM Tris-HCl pH 8
00:05:00 Incubation
Place on a magnetic stand and allow to clear for 3 min. Transfer the 30 µL of adapter ligated DNA to new 0.6-mL tube.
00:03:00 Magnet Stand
30 µL Adapter ligated DNA
Prepare KAPA PCR Master Mix (~20 µL per sample):
Add 20 µL KAPA PCR Master Mix to each sample and mix well by pipetting up and down 10 times.
20 µL KAPA PCR Master Mix
Place in thermocycler and run the following program with heated lid:
Note
CRITICAL STEP: To minimize the contribution of large DNA fragments, PCR cycles should be at least 12-14 cycles, preferably with a 10 s 60 °C combined annealing/extension step. Good results have been obtained with the Hyper-prep kit (KAPA Biosystems).
Note
CRITICAL STEP: After PCR is complete, be extra careful to avoid contamination of any pre-PCR reagents with post-PCR products, which have P5 and P7 primer binding sites at either end and so even a minute amount of contamination in a solution or on a pipette tip can dominate the final library. Ideally, post-PCR manipulations should be done at a workbench that is never used for pre-PCR steps.
Note
NOTE: To remove self-ligated adapter and left-over PCR reagents and prepare DNA libraries for sequencing, perform 2 more rounds of Ampure bead clean up.
Round 1: Add 1.1 X the volume of Ampure Beads (e.g. to 50 µL sample add 55 µL Ampure Beads) and mix well by pipetting up and down 10 times. Incubate at room temperature for 5-10 min to allow beads to bind DNA.
55 µL Ampure Beads
00:08:00 Incubation
Place on magnetic stand and allow to clear for 5 min. Without disturbing the beads remove liquid and discard.
00:05:00 Magnet Stand
110 µL Liquid Waste
Without disturbing the beads add 200 µL 80% EtOH solution and incubate for 30 seconds.
200 µL 80% EtOH
00:00:30
Leave the sample on the magnetic stand and remove and discard EtOH.
200 µL EtOH Waste
Repeat steps 99-100 to wash the beads a second time with 80% EtOH. Then carefully remove residual EtOH, and air-dry beads for 5 min.
00:05:00 Air-Dry
Remove tube from the magnet, add 50 µL 10 mM Tris-HCl pH 8, and pipette up and down 10X to resuspend beads. Incubate 5-10 min to allow DNA to elute off beads.
50 µL 10 mM Tris-HCl pH 8
00:05:00 Incubation
Round 2: To rebind the DNA to beads for a second clean up add 1.2 X the volume of HXP Buffer to DNA + beads (e.g. to 50 µL sample add 60 µL HXP Buffer) and mix well by pipetting up and down 10 times. Incubate at room temperature for 5-10 min to allow beads to bind DNA.
60 µL HXP Buffer
00:08:00 Incubation
Place on magnetic stand and allow to clear for 5 min. Without disturbing the beads remove liquid and discard.
00:05:00 Magnet Stand
110 µL Liquid Waste
Without disturbing the beads add 200 µL 80% EtOH solution and incubate for 30 seconds.
200 µL 80% EtOH
00:00:30
Leave the sample on the magnetic stand and remove and discard EtOH.
200 µL EtOH Waste
Repeat steps 105-106 to wash the beads a second time with 80% EtOH. Then carefully remove residual EtOH, and air-dry beads for 5 min.
00:05:00 Air-Dry
Remove tube from the magnet, add 25-55 µL 10mM Tris-HCl pH 8, and pipette up and down 10X to resuspend beads. Incubate 5-10 min to allow DNA to elute off beads.
30 µL 10 mM Tris-HCl ph 8
00:05:00 Incubation
Place on a magnetic stand and allow to clear for 3 min. Transfer the 20-50uL of CUT&RUN DNA library to new 1.5 mL tube.
00:03:00 Magnet Stand
30 µL CUT&RUN DNA library
CUT&RUN Library Analysis and Sequencing
Quantify library yield using dsDNA-specific assay, such as Qubit.
Note
TROUBLESHOOTING
Determine the size distribution of libraries by Agilent 4200 TapeStation analysis.
Note
TROUBLESHOOTING
Pool samples at equimolar concentrations and perform paired-end Illumina sequencing on the barcoded libraries following the manufacturer’s instructions.
Note
CRITICAL STEP: Because of the very low background with CUT&RUN, typically 5 million paired-end reads suffices for transcription factors or nucleosome modifications, even for the human genome. For maximum economy, we mix up to 48 barcoded samples and sequence the pool on an entire 2-lane flow cell, and perform paired-end 25x25 bp sequencing. Single-end sequencing is not recommended for CUT&RUN, as it sacrifices resolution and discrimination between transcription factors and neighboring nucleosomes.
Data Processing and Analysis
We align paired-end reads using Bowtie2 version 2.2.5 with options: --local --very-sensitive- local --no-unal --no-mixed --no-discordant --phred33 -I 10 -X 700. For mapping spike-in fragments, we also use the --no-overlap --no-dovetail options to avoid cross-mapping of the experimental genome to that of the spike-in DNA.
Note
CRITICAL STEP: Separation of sequenced fragments into ≤120 bp and ≥150 bp size classes provides mapping of the local vicinity of a DNA-binding protein, but this can vary depending on the steric access to the DNA by the tethered MNase. Single-end sequencing is not recommended for CUT&RUN, as it sacrifices resolution and discrimination between transcription factors and neighboring nucleosomes.
Note
TROUBLESHOOTING
Scripts are available from https://github.com/Henikoff/Cut-and-Run for spike-in calibration and for peak-calling.
Note
TROUBLESHOOTING