Jul 05, 2024
Comparison of Multiple Snap Freezing Protocols and Description of Optimal Workflow

- Zhixin Jing1,
- Andrea Radtke2
- 1Lymphocyte Biology Section, Laboratory of Immune System Biology, National Institute of Allergy and Infectious Diseases, National Institutes of Health, Bethesda, MD;
- 2Lymphocyte Biology Section and Center for Advanced Tissue Imaging, Laboratory of Immune System Biology, National Institute of Allergy and Infectious Diseases, National Institutes of Health, Bethesda, MD


Protocol Citation: Zhixin Jing, Andrea Radtke 2024. Comparison of Multiple Snap Freezing Protocols and Description of Optimal Workflow . protocols.io https://dx.doi.org/10.17504/protocols.io.81wgbz6yogpk/v1
License: This is an open access protocol distributed under the terms of the Creative Commons Attribution License, which permits unrestricted use, distribution, and reproduction in any medium, provided the original author and source are credited
Protocol status: Working
We use this protocol and it's working
Created: May 03, 2024
Last Modified: July 05, 2024
Protocol Integer ID: 99209
Keywords: Snap Freezing, Tissue Imaging, Spatial biology, Multi-omic single cell
Funders Acknowledgement:
This research was supported by the Division of Intramural Research, NIAID, NIH and the Center for Cancer Research, NCI, NIH
Grant ID: 1ZIAAI000545-35
Abstract
The goal of this protocol is to evaluate the optimal snap (flash) freezing method for multiplexed tissue imaging. We detail four different methods (see sample preparation) for preparing snap (flash) frozen tissues. We additionally compare the image quality, ease of use, and safety of each method to our preferred method of tissue preservation (fixed frozen with sucrose cryopreservation). To directly compare tissue preservation methods, tissues were collected from one mouse and divided among the five groups. We determined that the optimal protocol for snap frozen tissues is cryogenic freezing with the Seal'N Freeze Box followed by post-fixation of sections using 1% paraformaldehyde for 10 minutes at room temperature. This method was easy to do, froze the tissue quickly without tissue artifacts, and allowed for immunolabeling of antibodies after fixation.
Guidelines
Please carefully review the safety datasheets of all chemicals detailed here. These protocols involve the use of liquid nitrogen and dry ice for cryogenic freezing.
Materials
Biological materials
Lymphoid tissues were collected at day 8 post-immunization from a single mouse intramuscularly immunized with NP-OVA/AddaVax (20 μg/leg in 50 μl volume). This timepoint was selected because it corresponds to the peak of the germinal center response. Mouse draining lymph nodes, non-draining lymph nodes, and spleen samples were collected and distributed among the groups.
Reagents
| A | B | C | D | E | F | G | H | |
| Marker | Clone | Conjugate | Vendor | Cat No. | Isotype | RRID | Dilution | |
| B220 | RA3-6B2 | AF488 | BD Biosciences | 557669 | Rat IgG2a, κ | AB_396781 | 1:400 | |
| CD11c | N418 | AF647 | BioLegend | 117312 | Armenian Hamster IgG | AB_389328 | 1:100 | |
| CD3 | 17A2 | AF594 | BioLegend | 100240 | Rat IgG2b, κ | AB_2563427 | 1:200 | |
| CD35 | 8C12 | BV510 | BD Biosciences | 740132 | Rat IgG2a, κ | AB_2739889 | 1:600 | |
| CD169 | 3D6.112 | PE | BioLegend | 142404 | Rat IgG2a, κ | AB_10915697 | 1:300 | |
| Collagen IV | - | None | Abcam | ab19808 | Rabbit IgG | AB_445160 | 1:200 | |
| Ki-67 | B56 | AF700 | BD Biosciences | 561277 | Mouse IgG1, κ | AB_10611571 | 1:50 | |
| PD-1 | 29F.1A12 | BV421 | BioLegend | 135218 | Rat IgG2a, κ | AB_2561447 | 1:100 | |
| anti-Rabbit IgG | - | AF532 | Thermo Fisher Scientific | A-11009 | Goat IgG | AB_2534076 | 1:400 |
Rationale: B220 labels B cells within the B cell follicles, CD3 labels both CD4+ and CD8+ T cells in the T cell zones and CD4+ T cells in the germinal center, CD11c labels dendritic cells in the T cell zones, CD35 labels follicular dendritic cells in B cell follicles, CD169 labels subcapsular and medullary sinus macrophages, Collagen IV labels the extracellular matrix structure in the lymph node, Ki-67 labels cells that are actively proliferating or have recently entered cell cycle, and PD-1 labels T follicular helper cells.
‱ Blocking Buffer: Prepare Blocking Buffer from 1X PBS (Gibco, cat no. 10010-023) containing 0.3% Triton-X-100 (Millipore Sigma, cat no. 93443), 1% Bovine Serum Albumin (Millipore Sigma, cat no. A1933) and 1:100 dilution of Mouse Fc-block (BD Biosciences, cat no. 553141)
‱ diH2O (Quality Biological, cat no. 351-029-101)
‱ Fluoromount-G (Southern Biotech, cat no. 0100-01)
‱ 2-Methylbutane (Fisher Scientific, cat no. O3551-4)
‱ Optical Cutting Temperature (OCT) Compound (Fisher Scientific, cat no. 4585)
Equipment
‱ Laboratory marking pen (Ted Pella, Inc., cat no. 22315-0)
‱ Camel hair brush (Ted Pella, Inc., cat no. 11859)
‱ Cryostat (Leica Biosystems, cat no. CM1950)
‱ Histomolds, 10mm x 10mm x 5mm (Sakura, cat no. 4565)
‱ Histomolds, 15mm x 15mm x 5mm (Sakura, cat no. 4566)
‱ Seal'N Freeze Box (Ted Pella, cat no. 20956)
‱ Seal'N Freeze Cryotray intermediate cryomolds (Ted Pella, cat no. 20956-1)
‱ Jar forceps (12'', Fisher Scientific, cat no. 13-820-077)
‱ Styrofoam box (Corning, cat no. 432131)
‱ Dissection microscope (Microscope LLC, cat no. OM2300S-GX4)
‱ Fiber-Lite Mi-LED series Illuminator (Dolan-Jenner, cat no. MILEDUSB1)
‱ Safety goggles (Fisher Scientific, cat no. 19-181-513)
‱ National safety apparel waterproof cryogenic gloves (Fisher Scientific, cat no. 17-355-065)
‱ Lab coat (Fisher Scientific, cat no. 19-181-567)
‱ Superfrost Plus slides (VWR, cat no. 48311-703)
‱ Slide moisture chamber (Scientific Device Laboratory, cat no. 197-BL)
‱ PELCO BioWave Pro microwave (Ted Pella Inc., 36500-230) equipped with a PELCO SteadyTemp Pro (Ted Pella Inc., 50062) thermoelectric recirculating chiller
Before start
Review safety guidelines and institutional regulations related to the safe handling of liquid nitrogen. Use protective clothing and work in a well ventilated area.
Sample preparation
Sample preparation
Draining and non-draining lymph nodes were dissected and submerged in OCT-filled cryomolds. Orientation of each lymph node was adjusted using a dissection microscope to allow for a sagittal section of the lymph node. Spleen was cut into 2-3 mm thick wedge-shaped pieces with one piece distributed to each group. Spleen sections were submerged in OCT filled cryomolds.
1h
Group 1: Snap frozen liquid nitrogen + 2-methylbutane
Steps were done by following the NYU protocol (https://med.nyu.edu/research/scientific-cores-shared-resources/sites/default/files/nyu-expath-freezing-and-embedding-tissue.pdf)
45m
Group 2: Snap frozen liquid nitrogen
7m
Pour liquid nitrogen into a metal canister held in a shallow ice bucket (Corning, cat no. CLS432133) to a height of 2 inches.
2m
Use long forceps to hold samples (embedded in OCT-filled mold) in the liquid nitrogen as shown in the image below. Make sure the base of the mold is in contact with the liquid nitrogen. Do not submerge the mold in the liquid nitrogen but instead allow the bottom of the mold to rest at the top of the liquid nitrogen.
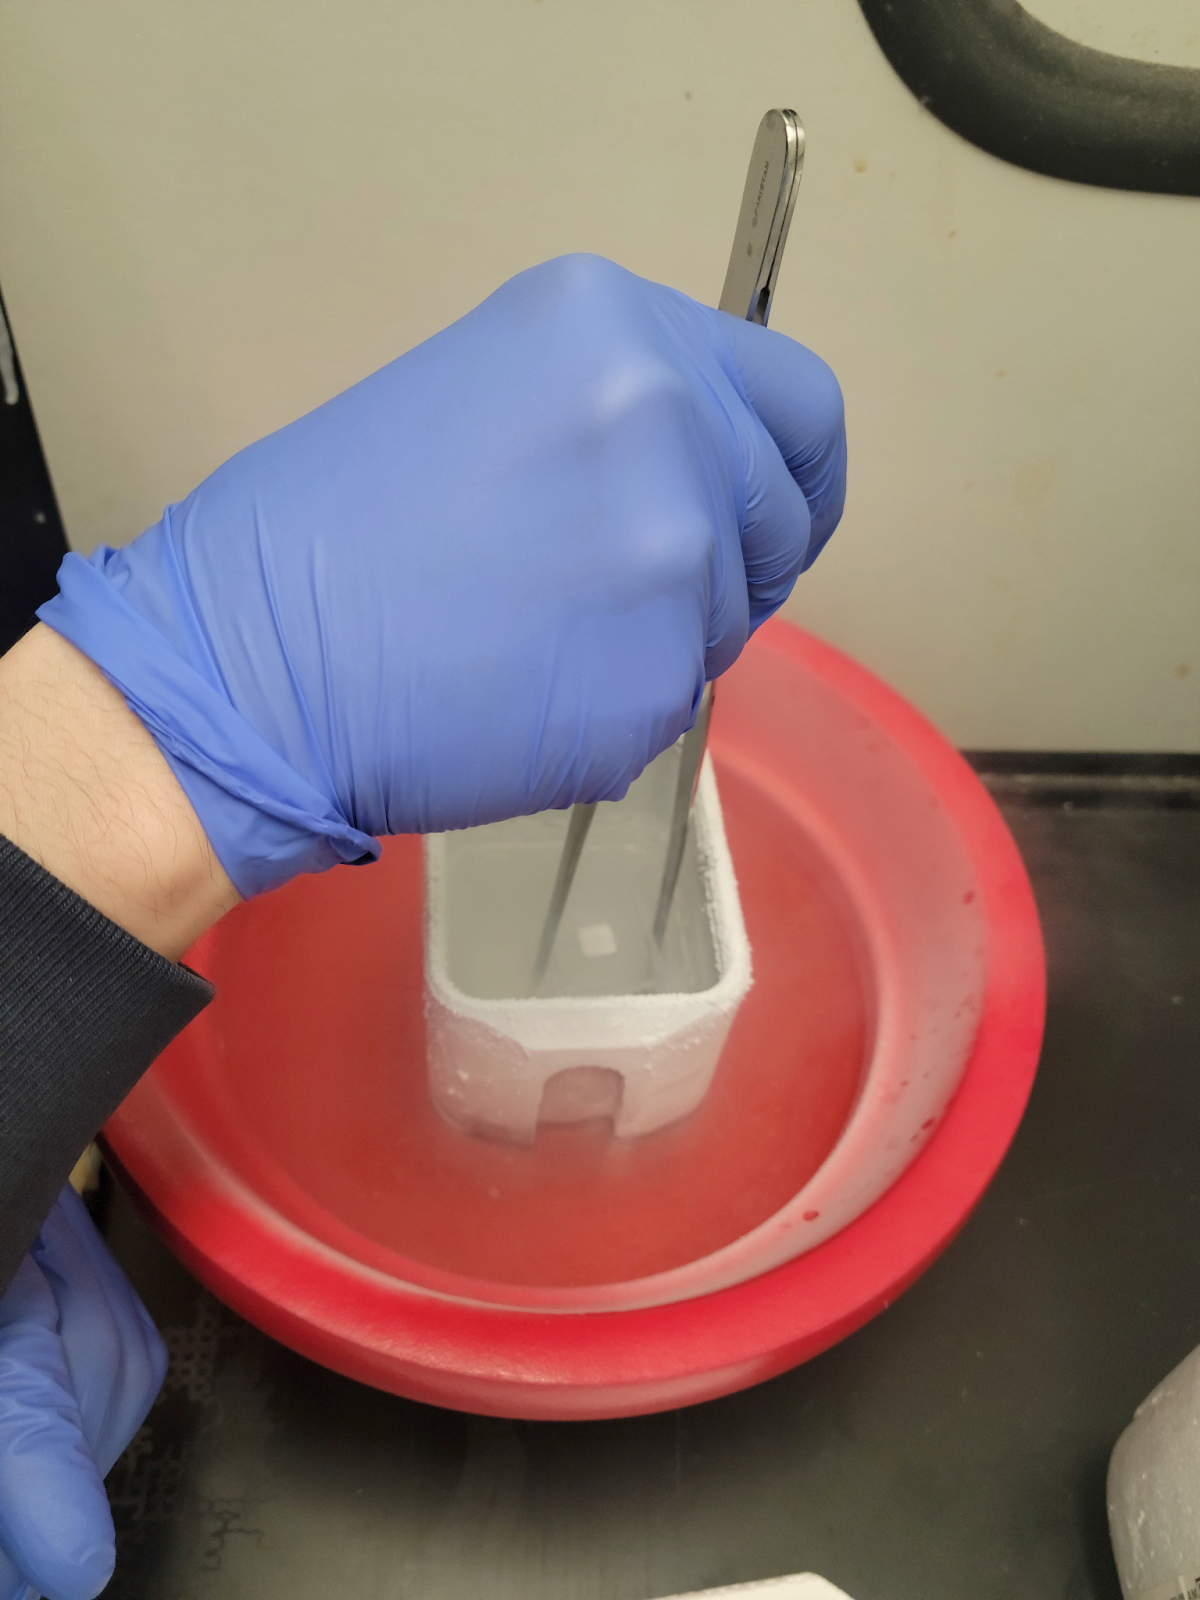
2m
Hold the sample steady for 1-2 minutes until the OCT at the center of the mold becomes solidified and turns white.
2m
Remove the blocks and wrap each block with aluminum foil. Store at -80C.
1m
Group 3: Dry ice
20m
Fill half of the ice bucket with small pellets of dry ice. Distribute pellets to allow a flat even surface to contact the bottom of the molds.
2m
Place tissues into the OCT-filled molds and put on top of the dry ice.
2m
Cover the ice bucket with a lid for 10-15 minutes until the OCT at the center of the mold becomes solidified and turns white.
15m
Remove the blocks and wrap each block with aluminum foil. Store at -80C.
1m
Group 4: Seal'N Freeze Box with liquid nitrogen
12m 30s
Steps were done by following the YouTube instructional videos (How to Embed in OCT for cryostat sectioning using Seal'N Freeze‱ Cryotrays‱ // Instructional Video)
Collect a cryo-resistant marker, a 4-sample Seal’N Freeze Cryotray, forceps, and OCT compound.
1m
Prepare the Seal’N Freeze Box by filling it with 240 ml of liquid nitrogen or just below the inner ledge of the Seal'N Freeze Box as indicated in the video (Step 5.1). Close the lid to prevent liquid nitrogen from evaporating while preparing the tissue samples.
2m
Label each mold with a unique identifier for different samples. Fill each mold with the OCT compound. Place each tissue sample into the OCT compound as described in ‘Sample preparation’ section.
5m
Seal each section of the tray by pressing firmly on opposing sides of the lid until hearing a snapping sound for completion of sealing.
30s
Use forceps to carefully rest the tray on the inner ledge of the box.
30s
Close the box and let the tray freeze for 1.5 minutes inside the box.
1m 30s
Use forceps to remove the tray from the Seal’N Freeze Box. Fold and tear each mold from the tray. Wrap individual molds with aluminum foil. Store at -80C.
2m
Group 5: Fixed and cryopreserved with 30% sucrose + dry ice
1d 16h 28m
Steps were done by following our published protocol (Radtke AJ et al., Nat Protoc 2022) (https://www.nature.com/articles/s41596-021-00644-9#Sec50)
Prepare 1:4 dilution of BD Cytofix/Cytoperm (1 ml fixative with 3 ml of 1X PBS).
1m
Add tissue samples into each well in a 24-well plate and fill with the diluted BD Cytofix/Cytoperm. Make sure the fixative fully covers the tissue, e.g., 2 ml per well in a 24 well plate.
2m
Incubate at 4C for 16-20 hrs.
20h
Prepare 30% sucrose solution 2 days in advance to make sure the sucrose is fully dissolved in PBS. The solution can be stored at 4C for a week or longer if kept sterile.
1h
After 16-24 hours, aspirate the BD Cytofix/Cytoperm solution from the wells. Do not allow the tissue to dry out.
1m
Add 1X PBS to each well for a few seconds, aspirate again, and wash a total of 3 times.
5m
After the last wash, immediately add ~2 ml 30% sucrose solution to each well to cover the tissue.
1m
Incubate at 4C overnight or longer depending on when the embedding process is performed. Samples can be kept up to one week in 30% sucrose before embedding in OCT but we prefer to embed within 24 hours.
18h
Prepare a bucket of dry ice.
1m
Fill a cryomold with OCT compound.
2m
Transfer tissue to a cryomold with appropriate orientation. See details in 'Sample preparation' section.
5m
Put each cryomold on dry ice for 20 minutes or until the OCT is solid and white. Store at -80C.
1h
Tissue sectioning and mounting on the slides were done as described previously (https://www.nature.com/articles/s41596-021-00644-9).
Antibody labeling was performed using the antibodies described in the Materials section and the microwave protocol outlined previously (https://www.pnas.org/doi/full/10.1073/pnas.2018488117). First, image quality was compared between Groups 1-4 (snap frozen) and Group 5 (control). Without fixation, the tissues partially lifted during washing and only Collagen IV labeling worked. See 'Summary of results before fixation of snap frozen tissues' table below.
Tissues from Groups 1-4 were additionally sectioned onto glass slides and sections on the slides were fixed with 1% paraformaldehyde (PFA) for 10 minutes at room temperature. Following fixation and washing with PBS, antibody labeling was performed using the antibodies included in the Materials section and microwave protocol. After fixation, all antibodies labeled the tissue sections from Groups 1-4. See Figure 1 for details. Note: We utilize a PELCO BioWave Pro 36500-230 microwave to accelerate antibody labeling; however, comparable immunolabeling is observed for thin (~5–10 µm) tissue sections incubated for 1 hour at 37 °C. Imaging was performed as outlined previously (https://www.nature.com/articles/s41596-021-00644-9).
10m
Summary of results before fixation of snap frozen tissues
Summary of results before fixation of snap frozen tissues
| A | B | C | D | E | F | |
| Group 1 | Group 2 | Group 3 | Group 4 | Group 5 | ||
| Ease of procedure | Not easy to do due to multiple steps and exposure to hazardous chemicals | Easy to do | Very easy to do | Very easy and convenient to do | Very easy to do | |
| Section appearance | Better texture than liquid nitrogen alone, less transparent than will liquid nitrogen alone, appears more like sections prepared using dry ice to freeze | Lymph node split, this happens when the inner core of the tissue sample freezes slowly and unevenly (See NYU Langone protocol) | Spleen and lymph node look identical to fixed sample frozen with dry ice (Group 5) | Tissue is more transparent than tissue frozen on dry ice, very similar to other liquid nitrogen samples (Group 2), no shearing, clear/transparent sections | As a standard quality control, tissue blocks had no shearing and non-transparent appearance | |
| Time to Freeze | Less than 2 minutes | Less than 2 minutes | 10-15 minutes | 15 minutes | 10-15 minutes | |
| Tissue adherence | Marginal loss of lymph node tissue integrity during tissue section washing after primary antibody staining;30-50% loss of spleen during washing after primary antibody staining | Lymph node samples not included;30-50% loss of spleen tissue integrity on sections during tissue section washing after primary antibody staining | No loss of lymph node tissue integrity during washing after primary antibody staining;30-50% loss of spleen during tissue section washing after primary antibody staining | Marginal loss of lymph node tissue integrity during tissue section washing after primary antibody staining;30-50% loss of spleen during washing after primary antibody staining | No loss of lymph node tissue integrity during washing after primary antibody staining;No loss of spleen during tissue section washing after primary antibody staining | |
| Image quality | Only Collagen IV staining is retained | Only Collagen IV staining is retained | Only Collagen IV staining is retained | Only Collagen IV staining is retained | All staining worked |
Qualitative comparison of snap freezing protocols based on quality of tissue preservation, ease of use, and safety. Image quality refers to antibody labeling of snap frozen samples without post-fixation (Groups 1-4).
Summary of results after fixation of snap frozen tissues
Summary of results after fixation of snap frozen tissues

Figure 1. Representative lymph node immunofluorescence imaging of post-fixed sections from each treatment group. Each row shows 4 pairs of markers that were imaged sequentially, and each column shows one pair of marker across 4 different groups. Group 2 was not included because the tissue block split during cryosectioning due to uneven freezing as detailed in the NYU Langone protocol shared in Step 2. Although Groups 1 and 3 showed positive labeling of all antibodies, antibodies directed against B220 and CD3 did not yield images as sharp as Groups 4 and 5 (control). Scale bar denotes X um.
Protocol references
How to embed in OCT for cryostat sectioning using Seal'N Freeze‱ Cryotrays‱ // Instructional Video https://www.youtube.com/watch?v=3sMTXM32vjg
Freezing tissues for histology. https://med.nyu.edu/research/scientific-cores-shared-resources/sites/default/files/nyu-expath-freezing-and-embedding-tissue.pdf
Radtke, A.J., Chu, C.J., Yaniv, Z. et al. IBEX: an iterative immunolabeling and chemical bleaching method for high-content imaging of diverse tissues. Nat Protoc 17, 378–401 (2022). https://doi.org/10.1038/s41596-021-00644-9
Radtke, A.J., Kandov, E., Lowekamp, B., et al. IBEX: A versatile multiplex optical imaging approach for deep phenotyping and spatial analysis of cells in complex tissues. PNAS, 117 (52) 33455-33465 (2020). https://doi.org/10.1073/pnas.2018488117